Creating a read-only user for OCI access is useful if you want to give your auditors or external providers only read privileges on all your Infrastructure resources or if you want to run oci-cli tool in a secure mode, with guarantee that no changes will happen in your Oracle Cloud Infrastructure.
In this article I will show how to create a user with read-only minimum privileges and assign it to oci-cli tool.
Let's start. Connect in you Oracle Cloud Infrastructure web console with a administrator user.
1. Create User.
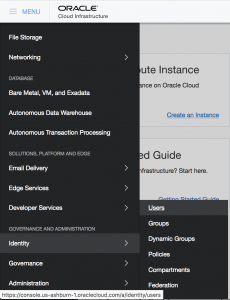
First step is to create a new read-only user. Go to Menu -> Identity -> Users and click "Create User".
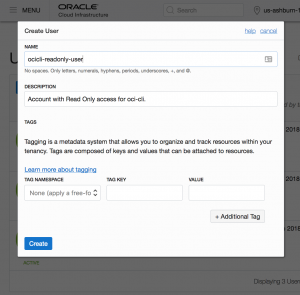
Give the user a Name and a Description.
2. Create Group.
In OCI, privileges are given to a group, not an user. So you must create a new group to place this account and later we will give the list accesses to the group.
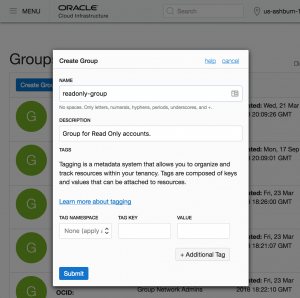
Go to Menu -> Identity -> Group and click "Create Group".
Give the group a Name and a Description.
3. Create Policy.
Now let's create the policies (or permissions) and assign it to the group.
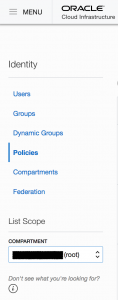
Go to Menu -> Identity -> Policies.
Before clicking in "Create Policy", ensure you are in the root compartment (right panel).
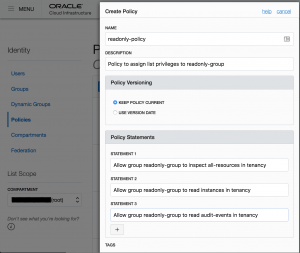
Click "Create Policy" and give the policy a Name, Description.
Now it's time to assign policies to the rule. You have 2 ways to go here:
A. If you want to give read access to ALL resources, you can simply add the statement:
• Allow group group_name to read all-resources in tenancy
* Change group_name to the one assigned in step 2.
B. However, if you want to be more restrictive, you can give only inspect access on ALL resources and give the read on very specific ones. "Inspect" don't give the ability to get user-specified metadata and the actual resource itself.
• Allow group group_name to inspect all-resources in tenancy
• Allow group group_name to read instances in tenancy
• Allow group group_name to read audit-events in tenancy
* Change group_name to the one assigned in step 2.
For more information, please check https://docs.cloud.oracle.com/iaas/Content/Identity/Reference/policyreference.htm
4. Add User to Group.
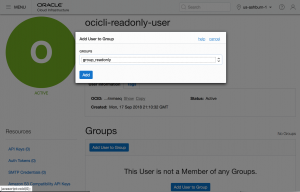
Go again in Menu -> Identity -> Users, click on the created user. Go to the "Group" resource on the left panel and select "Add User to Group".
Perfect. Now you have your new user ready. Now let's configure oci-cli to make use of it.
5. Setup oci-cli with new created user.
Now let's configure oci-cli. Before starting, note down the values of the information below:
- User OCID (available at Menu -> Identity -> Users -> [click on user])
- Tenancy OCID (available at Menu -> Administration -> Tenancy)
Once you have installed it, the first thing to do start the configuration:
$ oci setup config
localhost:~ myuser$ oci setup config
    This command provides a walkthrough of creating a valid CLI config file.

    The following links explain where to find the information required by this
    script:

    User OCID and Tenancy OCID:

        https://docs.us-phoenix-1.oraclecloud.com/Content/API/Concepts/apisigningkey.htm#Other

    Region:

        https://docs.us-phoenix-1.oraclecloud.com/Content/General/Concepts/regions.htm

    General config documentation:

        https://docs.us-phoenix-1.oraclecloud.com/Content/API/Concepts/sdkconfig.htm


Enter a location for your config [/Users/myuser/.oci/config]:
Enter a user OCID: ocid1.user.oc1..aaaaaaaafas7f86as786f87as6f786a7861gjasljfkasfa87tsfakjshkjf
Enter a tenancy OCID: ocid1.tenancy.oc1..aaaaaaaafah98shf1h8salkfajnsnbqbkjsqfha89fhqhwlksahf9aasfha9
Enter a region (e.g. eu-frankfurt-1, uk-london-1, us-ashburn-1, us-phoenix-1): us-ashburn-1
Do you want to generate a new RSA key pair? (If you decline you will be asked to supply the path to an existing key.) [Y/n]: Y
Enter a directory for your keys to be created [/Users/myuser/.oci]: [ENTER]
Enter a name for your key [oci_api_key]: [ENTER]
Public key written to: /Users/myuser/.oci/oci_api_key_public.pem
Enter a passphrase for your private key (empty for no passphrase): [ENTER]
Private key written to: /Users/myuser/.oci/oci_api_key.pem
Fingerprint: e6:ff:92:69:5c:34:6a:10:e7:a2:ac:8e:16:38:da:a6
Config written to /Users/myuser/.oci/config


    If you haven't already uploaded your public key through the console,
    follow the instructions on the page linked below in the section 'How to
    upload the public key':

        https://docs.us-phoenix-1.oraclecloud.com/Content/API/Concepts/apisigningkey.htm#How2


localhost:~ myuser$
6. Add user fingerprint and key on the OCI.
Now let's go back to OCI and add the user public key there so he is able to connect.
First get the generated public key for the user:
localhost:~ myuser$ cat /Users/rodrigo.jorge/.oci/oci_api_key_public.pem
-----BEGIN PUBLIC KEY-----
MIIBIjANBgkqhkiG9w0BAQEFAAOCAQ8AMIIBCgKCAQEA9s79/Si8AGj8jswA300i
NB/NjiAeFeOLa2mkfm/NG75fO8mD7e0XgiOYXuz93oqksR1Kuvoo4Ql3VZwvSDtV
Leyrp9jNmE9/uAfzzzbFl5OEGjZWSZRVP97/oJoGvjZNnecU/z9nIGcsYGs3fL1K
vkioPxIWjtXFt5RRXmolxDi61qvgHpUbo9+3nwi57G3y1yeWLRKlasAvZezulvQN
Xfjvqjua9IyZsMxUzTQ3VtVDAomPUfhVk1IxqINyIm40wpu+/e7U7lX4YXpvnLHw
5N9FaVIAOLE8N0B4K/UxDSi0xFpeBgp6uuvAsyIdKJXumlxQymBulY6Kq/w6pVk+
6QIDAQAB
-----END PUBLIC KEY-----
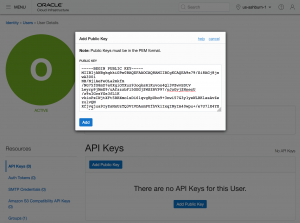
Go again in Menu -> Identity -> Users, click on the created user. Go to the "API Keys" resource on the left panel and select "Add Public Key".
7. Test the configuration.
To test if your oci configuration is working, simply run a oci-cli command as the below:
localhost:~ myuser$ oci iam region-subscription list
{
  "data": [
    {
      "is-home-region": true,
      "region-key": "IAD",
      "region-name": "us-ashburn-1",
      "status": "READY"
    },
    {
      "is-home-region": false,
      "region-key": "PHX",
      "region-name": "us-phoenix-1",
      "status": "READY"
    }
  ]
}
Have you enjoyed? Please leave a comment or give a 👍!


4 comments
Skip to comment form
Very helpful Rodrigo!
Rhodrigo,
Please confirm we can assign RO permission to user from Console directly or OCI-CLI setup is also Mandatory once console user/grp/policy tasks is Done.
I want to setup same for my OCI tenancy
Author
Hello!
No, you don't need the oci-cli steps. It was only added there as it is most useful for this utility to be used without writing risks.
Regards,
RJ
Thanks for the tip Rodrigo. Came in really handy.